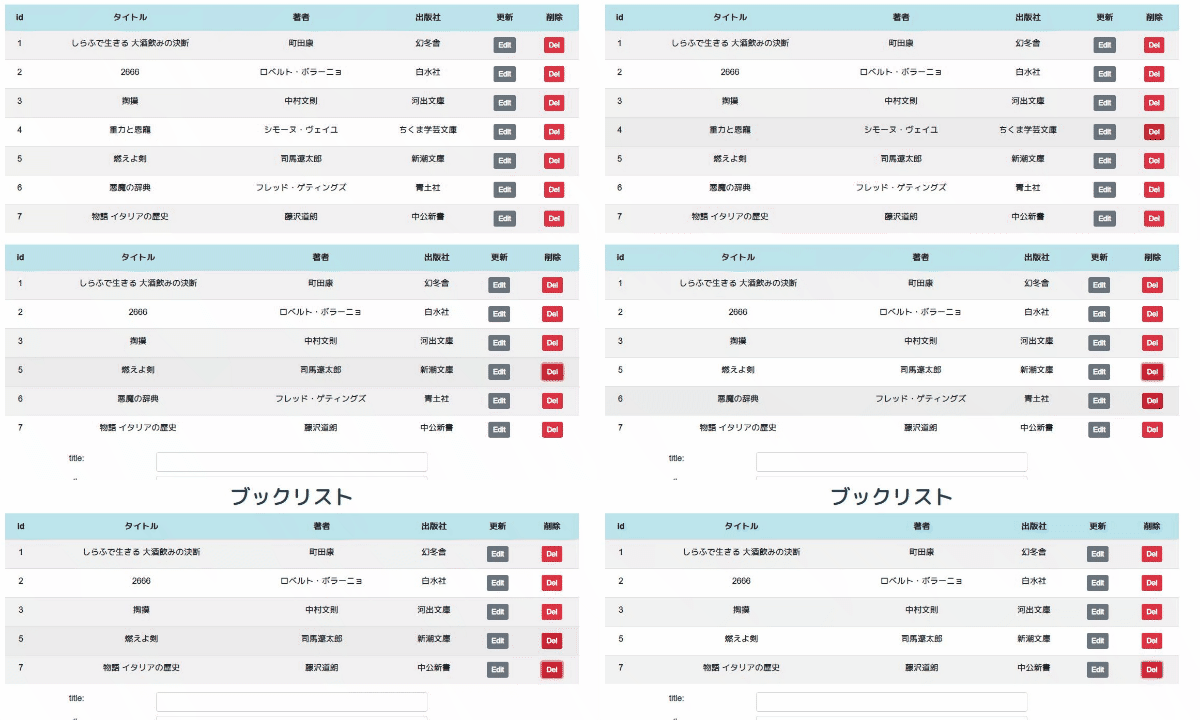
FlaskとVue.jsで作る簡易Webアプリフロントエンド編です。
セッティング
バックエンド(API)とのやりとりに必要なaxiosをインストールします。
npm install axios
こちらは必須ではありませんがBootstrapとBootstrap-Vueをインストールします。
npm install bootstrap-vue bootstrap
画面の作成
ブックリストをテーブルで表示してテーブル上で更新と削除ができるようにします。
新規登録はテーブルの下に作成します。
/src/views/Booklist.vue
 1<template>
 2  <div class="booklist">
 3    <div class="container">
 4      <div class="row">
 5        <div class="col-sm-12">
 6          <h1>ブックリスト</h1>
 7          <table class="table table-hover table-striped">
 8            <thead>
 9              <tr class="table-info">
10                <th>id</th>
11                <th>タイトル</th>
12                <th>著者</th>
13                <th>出版社</th>
14                <th>更新</th>
15                <th>削除</th>
16              </tr>
17            </thead>
18            <tbody v-if="!edit">
19              <tr v-for="(item,index) in items" :key="index">
20                <td>{{item.id}}</td>
21                <td>{{item.title}}</td>
22                <td>{{item.author}}</td>
23                <td>{{item.publisher}}</td>
24                <td>
25                  <b-button v-if="!edit" @click="Edit(item.id)" size="sm">Edit</b-button>
26                </td>
27                <td>
28                  <b-button @click="del(item.id,index)" variant="danger" size="sm">Del</b-button>
29                </td>
30              </tr>
31            </tbody>
32            <!--------- 編集モード ----------->
33            <tbody v-if="edit">
34              <tr v-for="item in items" :key="item.id">
35                <td>{{item.id}}</td>
36                <td v-if="itemid == item.id">
37                  <input v-model="item.title" size="10" />
38                </td>
39                <td v-else>{{item.title}}</td>
40                <td v-if="itemid == item.id">
41                  <input v-model="item.author" size="10" />
42                </td>
43                <td v-else>{{item.author}}</td>
44                <td v-if="itemid == item.id">
45                  <input v-model="item.publisher" size="10" />
46                </td>
47                <td v-else>{{item.publisher}}</td>
48                <td v-if="itemid == item.id">
49                  <b-button
50                    @click="update(item.id,item.title,item.author,item.publisher)"
51                    size="sm"
52                  >update</b-button>
53                </td>
54                <td v-else></td>
55                <td v-if="itemid == item.id">
56                  <b-button @click="cancel" size="sm">Cancel</b-button>
57                </td>
58                <td v-else></td>
59              </tr>
60            </tbody>
61          </table>
62        </div>
63      </div>
64      <!---------- 新規登録 ----------->
65      <b-container>
66        <b-row v-for="text in texts" :key="text">
67          <b-col sm="3">
68            <label>{{ text }}:</label>
69          </b-col>
70          <b-col sm="6">
71            <b-form-input :id="text" type="text" class="mb-2"></b-form-input>
72          </b-col>
73        </b-row>
74        <b-button @click="add">登録</b-button>
75      </b-container>
76    </div>
77  </div>
78</template>
scriptの一部
<script>
const axios = require("axios").create()

export default {
  name: "booklist",
  data() {
    return {
      items: [],
      edit: false,
      itemid: "",
      texts: ["title", "author", "publisher"]
    };
  },
  mounted() {
    this.getItems()
  },
  methods: {
    getItems() {
      /* eslint-disable */
      const response = axios.get("http://localhost:5000/api/bookapp")
        .then(response => {
          console.log(response.data)
          this.items = response.data
        }).catch(error => {
          console.log(error.response.data)
        })
    },

// 省略
tbodyは通常モードと編集モードで分けるためにv-if="!edit"とv-if="edit"で分けています。
editはデフォルトでfalseになっていて、editボタンを押すとtrueになって編集モードになります。
全部のテーブルが編集モードになっても意味がないのでeditボタンを押したところだけ開くようにしています。
cancelでもとに戻す処理。
Edit(id) {
      this.edit = true
      this.itemid = id
    },
cancel() {
      this.edit = false
    }

delボタンを押すとその行のリストを削除します。
del(id,index) {
      const data = { id: id }
      axios.delete("http://localhost:5000/api/bookapp", { data: data })
        .then(response => {
          this.items.splice(index, 1)
          console.info(response.data.message)
        })
    }
axiosのdeleteは第2引数にdataをkey名でセットする必要があるので、{ data: data }
としてバックエンドに送っています。
idに紐付いたデータを削除するだけではなく、テーブルからも取り除く必要があるので
this.items.splice(index, 1)
で取り除いています。

新規登録のメソッド
add() {
      var title = document.getElementById("title").value
      var author = document.getElementById("author").value
      var publisher = document.getElementById("publisher").value
      const params = { title: title, author: author, publisher: publisher }
      axios.post("http://localhost:5000/api/bookapp", params)
        .then(response => {
          const id = response.data
          const newitem = {
            id: id,
            title: title,
            author: author,
            publisher: publisher
          }
          this.items.push(newitem)
          console.log(response)
        }).catch(error => {
          console.log(error.response.data)
        })
    }
登録後にconst id = response.dataでflaskから返されたid番号を取得して、this.items.push(newitem)でテーブルに追加しています。

これでFlaskとVue.jsで作った簡易アプリにCRUD機能を実装できました。
ソースコードはこちらから。
参考
Vue.js 日本語ガイド
BootstrapVue
axiosライブラリを使ってリクエストする
配列の要素挿入、置き換えもsplice()で。Vue.jsでも大丈夫。( 配列とかおれおれAdvent Calendar2018 – 07日目)